
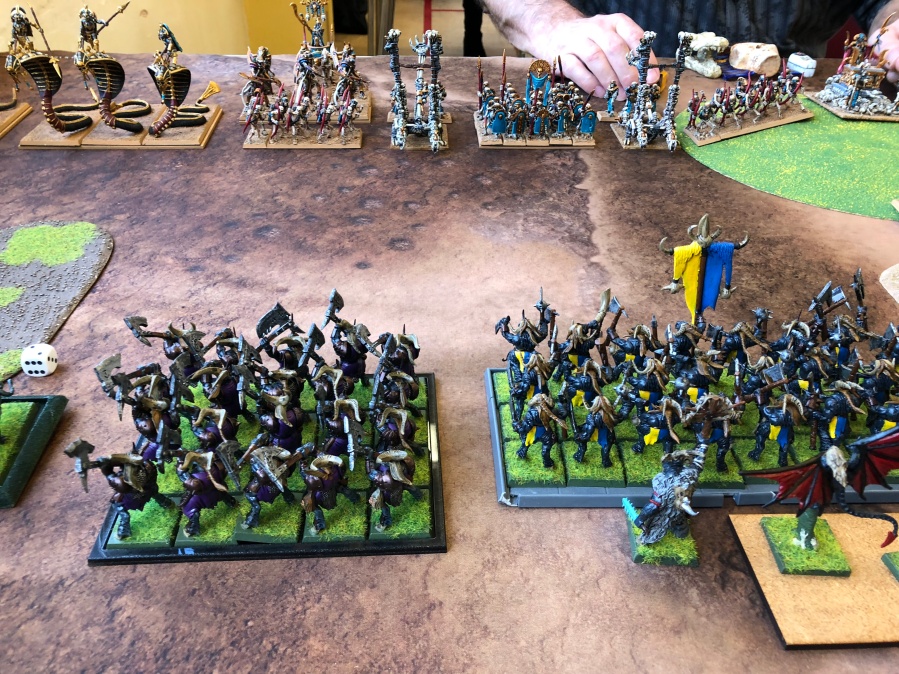
My third and final group game was against Neil and his Empire of Dust (Tomb Kings) army. I was very much looking forward to this game as I’d not only not played Neil before also never played the Empire of Dust either. As an extra bonus, I’d seen his Tomb Kings army several years ago and it is beautifully painted, so I’d also be able to get some great shots of it up close and personal.
As ever with my recent KOW reports, I took no notes and so there is some poetic licence in the write ups and any mistakes are down to this lack of notes and piecing together what happened from a sketchy memory and photos.
Lists
The Herd
Khazbar – Shaman – Heal, Critter Call, Amulet of the fire-heart – 150pts
Wazzock – Shaman – Heal, Shroud of the Saint – 145pts
Spirit Walkers – horde – Brew of Strength – 260pts
Spirit Walkers – horde – Blessing of the Gods – 255pts
Guardian Brutes – horde – Potion of the Caterpillar – 250pts
Stampede – horde – Brew of Haste – 275pts
Beast Pack – troop – 70pts
Beast Pack – troop – 70pts
Harpies – troop – Staying Stone – 95pts
Brutox – 220pts
Brutox – 220pts
Tribal Longhorns – regiment – 145pts
Tribal Longhorns – regiment – 145pts
Total 2300pts
Neil’s EoD
Skeleton Spearmen – Regiment – 105pts
Revenants – horde – casket of the damned, Hann’s Sanguinary Scripture – 225pts
Skeleton Archers – troop – 75pts
Skeleton Archers – troop – 75pts
Mummies – Regiment – 170pts
Enslaved Guardians – horde – casket of the damned – 255pts
Swarm – regiment – 65pts
Revenant Worm Riders – horde – Potion of the Caterpillar – 230pts
Revenant Worm Riders – horde – 210pts
Monolith – warmachine – 80pts
Balefire Catapult – warmachine – 100pts
Balefire Catapult – warmachine – 100pts
Soul Snare – warmachine – 150pts
Pharaoh on Chariot – 195pts
Cursed High Priest – 120pts
Arkhanten – 145pts
Total – 2300pts
Prematch rolls
Terrain
As I knew I’d be running a little late, I had told Neil to roll and set up Terrain. He had used an independent adjudicator to roll and ended up with Map pack 3 from the TO’s chart which consisted of:
3*forest, one of which had to be placed in the dead centre of the table (all height 4)
2*marshes (all height 0 and difficult terrain)
2*Hills (all height 2)
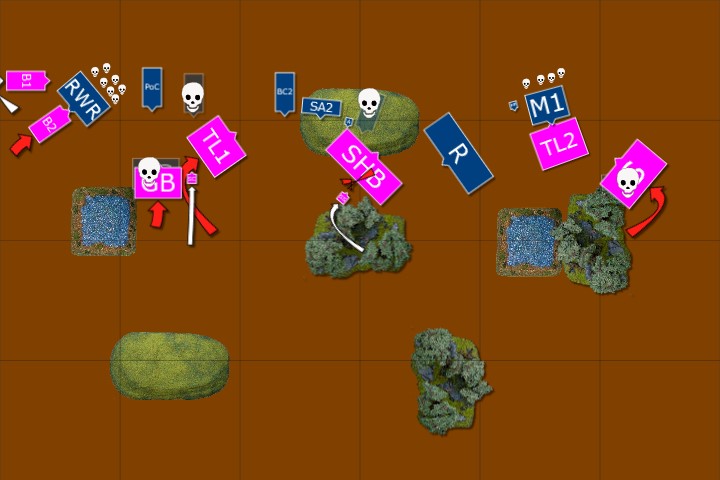
The terrain placement looked like this:

Scenario
The scenario played was ‘Invade’: You gain points equal to your unit strength for each scoring unit in your opponents half of the table.
Nominated Unit
To be a bit different from my previous games, my nominated unit to gain experience (if it survived), was the Stampede.
Deployment & Plan
Neil won the choice of sides and was careful to think about which side he wanted. I pointed out to him that this was another game where my pathfinder skills would mean the terrain would have no negative effects for my army. As such his decision basically boiled down to: did he want the additional tree base in his deployment zone or not. In the end he decided he didn’t want it impeding his forces as he rightly knew, I’d have the advantage of speed.
I have to say, this was my kind of scenario. As I’d be moving as fast as possible to engage Neil’s forces, it played into my armies strengths. As such my strategy was fairly simple, move everything across the board as fast as possible to engage his forces, thus scoring and preventing him from doing the same.
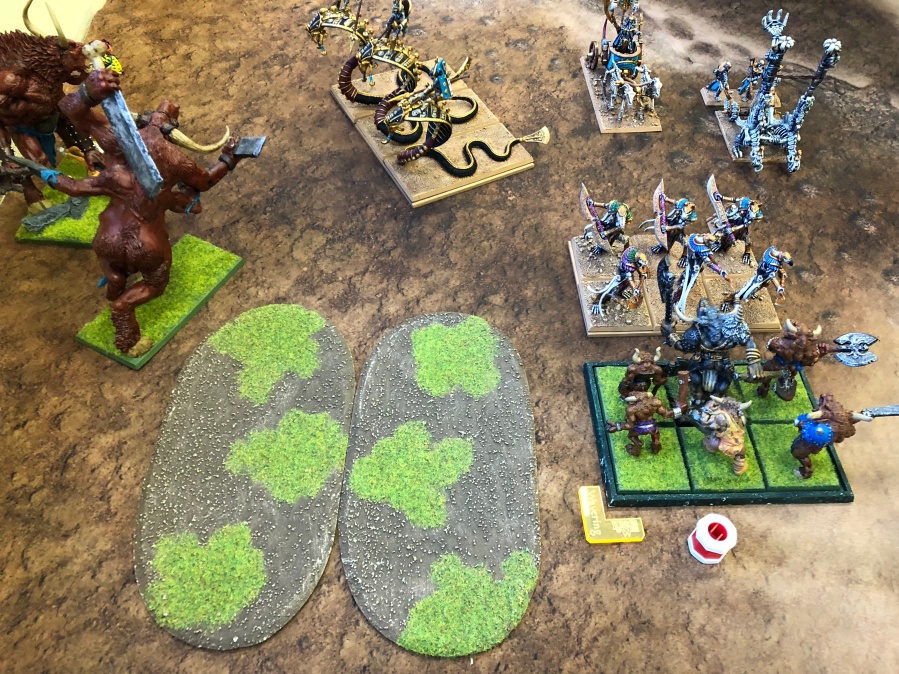
I kept deployment fairly similar to my previous games. The two hordes of spirit walkers front and centre, supported by the shamans and with the Longhorns guarding their flanks. The Stampede went on one flank to threaten that and the two Brutox on the other. When his two hordes of Worm Riders went together, I knew the Guardians had to be placed to support the monsters.
After deployment it looked like this.


Opening Gambits
The mighty herd continued its trend of winning the first turn and again, after the compulsory careful measuring of the opponents charge distances, moved up as far as possible, whilst remaining just outside of them. The central horde of warriors went just onto the edge of the woods to ensure they could charge through next turn.
On the right, the Warbeasts started to move across to cause mischief. The Longhorns advanced at the double straight into the marsh, where their pathfinder would afford them the advantage of any combat. The Stampede moved up a little bit, worried about the charge distance of the swarm.


On his right flank, the skeleton spearmen moved up to run interference at the rapidly advancing herd. One of the units of archers also moved up to block the guardian brutes.
On his left, the horde of Revenants moved up a little. The swarm advanced to block the stampede and the mummies angled to cover that flank.
And then the shooting and magic started. Fire poured from all directions into one of the Spirit Walker hordes. The damage caused was then multiplied by the spells thrown into it (helped by the monolith boosting everything nearby). This combined fire swiftly removed the strength boosted warriors much to my chagrin.
Interestingly (at least for me) was the difference in perception we had. The amount of firepower and the ease that it removed one of my toughest hordes really worried me. Conversely Neil was taken aback that it had taken everything he had just to remove one horde!


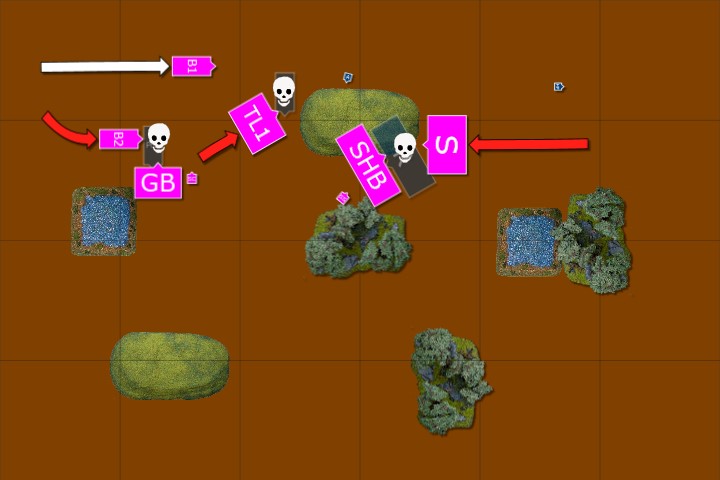
First Strike
Not wasting any time, the two Brutox charged into the Revenant Worm Riders at the far end of the line. The combined might of the monsters was enough to tear apart the unit and one overran whilst the other reformed to face the second unit of Riders who had been engaged by a unit of war beasts (I was attempting to both block them and remove their thunderous charge).
The Guardian Brutes also couldn’t contain themselves at such an easy target in front of them and swiftly crushed the feeble archers. They did back up a bit, as the Enslaved Guardians were lined up to take full advantage of the newly formed gap in the undead lines.
The elite Longhorns also joined in the fun getting a first strike on the skeleton spearmen. With their limited attacks, it was always going to be a tall order to remove them in a frontal charge but they surprised us both and managed the feat! (I’m not sure if remembered their Phalanx rule, which may have made a difference to this).
With the last shooting round fresh in my mind, I also sent the harpies forward into the second unit of archers. The shrieking flyers were unable to taken them down but were able to disorder them, so they wouldn’t be able to shoot the following turn.
Khazbar then cast critters call on one of the Catapults to also prevent it firing.
The remaining warriors stormed through the woods and overwhelmed the Monolith and crew with ease, their overrun putting them on top of the Soul Snare (Casket of Souls) and Arkhanten.
On my right, the Beast pack moved to block the horde of Revenants. The Longhorns charged the mummies. I wasn’t expecting them to come out on top in that match up but if I could hold them up for a turn, it would allow the Stampede to swing round and assist.
It was then I realised my error. I had forgotten about woods being line of sight blocking and sight on charges being measured from the leader point (centre of a unit). This meant the Stampede couldn’t charge the swarm. So instead I just moved them up into the woods and hoped that the Longhorns would be able to hold until the Stampede could come to their aid.


The Counter
With the majority of the herd forces both in his half of the table and threatening to break through his lines, Neil knew he had to launch a counter. The remaining horde of Worm Riders had no choice but to attack the Beast Pack blocking their path. The outcome was a foregone conclusion with the dogs obliterated in short order. The Worms then turned to face the inevitable charge of the Brutox. It wasn’t ideal for the riders but at least only one of the two monsters had the angle to charge in.
The Enslaved Guardians engaged the Guardian Brutes, who were able to hang on by a thread becoming wavered in the process (two pips more would have removed the unit. Thankfully because of their Fury rule, they would still get to attack next go).
The Pharaoh on the Chariot repositioned in order to provide support for the Worm Riders and Enslaved Guardians.
The archers, unable to fire, charged into the harpies (I think. Somehow they were taken out, though combat seems unlikely as the archers only hit on a 6+).
The Revenants easily removed the other pack of dogs and swung round ready to engage the spirit warriors.
The Swarm, as expected, charged into the Stampede and inflicted some damage but they were terribly outclassed and barring a miracle, wouldn’t survive the return attacks.
The surprise of the turn, came from the Mummies. After most of their damage had been healed by the nearby High Priest, they then proceeded to completely whiff their attacks and failed to rout the Longhorns (Neil claimed this was fairly standard for his rolling and in fairness his rolling was ‘less than hot’ all game).


Mid Game
As expected, the Stampede stomped the swarm into the dirt and wheeled round ready to engage the mummies after the longhorns inevitably perished in the war of attrition. That unit in turn, tried to inflict as much damage as they could onto the embalmed warriors, in order to soften them up before the stampede arrived.
The Spirit Walkers continued their rampage through the centre of the Empire of Dust lines, this time easily removing the Soul Snare. I was definitely feeling a bit better about things now.
On the other flank, the Longhorns charged the nearest Catapult reducing it to a pile of bones. They then set their sights on the other warmachine. This did expose their flank to the chariot mounted Pharaoh but the Brutes moved up to threaten a counter (aided by a heal thrown on by Khazbar).
The Brutox hit the front of the Worm riders, causing some damage whilst the other Brutox moved to hit their flank.


The Worm Riders counter charged the Brutox but were unable to cause enough damage to remove it. The Pharaoh, with very little choice, charged the Guardians but the heals they had received meant he too was unable to wound enough times to rout them. The Skeleton Archers moved to engage the Longhorns in a desperate attempt to prevent them getting to the remaining catapult*.
The Revenant horde surged into the Spirit walkers and caused a decent amount of damage to their opposite number.
On the far side, the mummies finally overcame the Longhorns and turned to face the charge of the Stampede.
*Note, this could be entirely made up as I can’t remember how they were destroyed but something removed the skeletons and this is the only thing I can think of. (It wasn’t helped that I forgot to take any photos over the next few turns!).

Final Moves
The second Brutox slammed into the flank of the Worm Riders and with another in the front, the riders were quickly overwhelmed. This effectively finished off the last major threat on this side of the table.
The Brutes (further healed by the shaman) laid into the Pharaoh. The damage caused was considerable but he held on.
The Longhorns, easily removed the archers and now nothing remained between them and the final warmachine.
The two infantry hordes continued their struggle but with the Warriors inflicting the damage this turn (whilst being healed by the shaman).
The Stampede hit the damaged mummies at full force and tore straight through them. This ended the resistance on that flank and left them poised to hit the rear of the Revenant horde.

The Revenant horde continued to attack the warriors. If they could remove that threat, they could reform to try and take on the Stampede the next turn. Alas the sheer volume of heals Wazzock had been able to provide prevented this outcome and it meant the final combat unit of the Empire was up the creek without a paddle.
The catapult attempted to shoot at the Longhorns but the shot scattered.
The Pharaoh once again engaged the Brutes but in a show of poor rolling the Minotaur’s again survived! (I love this unit).
The High Priest, realising that he was on his own with a large horde of slavering, angry, murderous beasts looking his way, quickly moved out of their sight.


In the final turn, we basically rolled a bunch of nerve tests as most of his forces were faced with a huge amount of attacks on hugely damaged units. One of the Brutox hit the flank of the Pharoah, to combine with the Guardian Brutes. The Pharaoh didn’t survive.
The Longhorns hit the Catapult and with triple attacks, that was also swiftly removed.
With 40 attacks to their front and 90(!) hitting their rear, the Revenant horde was also utterly crushed and with this, Neil called the game as he had precisely 2 characters left and no scoring units.
Result
With 13 points of unit strength in Neil’s half of the board and none in mine, it was a win for me.
We also had to record unit strength killed, in case of any tiebreakers:
Me = 21 points of unit strength killed (Horde 4*3=12, Regiments 3*2=6, Troops 3*1=3)
Neil = 8 points of unit strength killed (horde 1*3=3, Regiments 1*2=2, Troops 3*1=3)
With the Stampede surviving, they were able to roll on the Experience table and gained ‘Skilled’, giving them +2 attacks.
Neil’s nominate unit was destroyed so didn’t gain experience.
This was also the last game to play in our group and in a surprising turn of events, I ended up topping the table. What was especially pleasing was I also cleared up on the damage caused because, let’s be honest, that’s the bit that really matters. So this means both myself and Cormac advance into the draw for the quarter finals.

In case you are wondering about the points. It was 2 for a win and 1 for a draw.
Everyone in the group got a bonus point for playing their first game before the deadline (I think it was the end of May) and all players in the group got a second bonus point for completing all their games before 2 August.
Conclusions
I don’t mind saying I was quite worried at the start of the game. Part of the issue was having played Empire of Dust before and not having read up on what any of his units did beforehand, so I wasn’t sure what I should be the most worried about! This in turn put me a little on the back foot when unexpected things happened such as mages starting to cast two spells each turn and the monolith boosting every spell.
I chose to counter that in the time honoured Herd tradition of stomping everything within range and that worked out pretty well for me!
Neil was always going to be on the back foot with this scenario as getting a large amount of your forces across the table when they can’t move at the double, is a tough order. Then losing the first turn meant I was able to get pretty much into his half of the table straight away and this meant his shooting would have limited time to be effective.
One of the reasons I do enjoy writing these reports up, is I get to review and analyse the battles. When you win it’s harder to do that to your own performance but I didn’t feel I did anything particularly wrong (except not moving the stampede up into the woods but that’s what you get for switching between Warhammer and KOW and forgetting the differences). I should also point out that Neil was also terribly unlucky with some of his rolls. Some of his attack were appalling and how he didn’t remove my Guardian Brutes I will never know!
Neil was quite put out about his overall performance in the competition so I’m going to put down just a couple of thoughts of where I think he went wrong (at least in this game) and what the list is missing. I don’t consider myself a great table top general in any sense but as they say, hindsight is a wonderful thing and I hope these won’t come across in any way arrogant and are taken in the manner they are meant (to hopefully be helpful).
Chaff – I think this is the one thing his army is lacking. I feel chaff is king in this game. The ability to block opponents and allow your own units to get into position is key. The closest unit that fulfils this role in his list is the Swarm but ideally you want something faster moving and nimble. Probably the best option in the EoD army list is a troop of Skeleton Cavalry. Although they are still shambling (so can’t move at the double) they do have a natural movement of 9” and can be surged. The other option is the troops of 3 scavengers. They have the advantage over the cavalry of being able to fly and are not shambling so can move at the double. I’d recommend at least three units of chaff in one form or another.
Shooting – With how I feel about chaff and how I use it, he should have concentrated some of his shooting/magic on removing some/all of my chaff units. As mentioned above, not doing this, allowed me to block his units and position my own hard hitters so I could dictate combat. I can understand why he wanted to remove some of my hordes as they had shot across the table and were probably pretty intimidating. I’m also not sure of the effectiveness of the shooting, especially the war machines (something that I think is a bit of an issue across the board in this version of KOW and hope they fix in the 3rd edition). The two troops put out 16 shots but they only hit on 5’s. Likewise the catapults require 5’s to hit. This makes it unlikely they will hit often. The archers up their chances due to the volume of fire but at 100pts each, I’d want more reliability from the war machines.

Good result for you – well done! Very nice looking game! 🙂
LikeLiked by 1 person
Cheers John
LikeLiked by 1 person