
My second game of the competition was against my old adversary Luke, fielding his beautiful old school ‘not’ Warriors of Chaos. As normal we weren’t taking our game particularly seriously and spent a great amount of time chatting. So much so that it is the first time I’ve ever failed to finish a game of KOW!
Lists
The Herd
Khazbar – Shaman – Heal, Critter Call, Amulet of the fire-heart – 150pts
Wazzock – Shaman – Heal, Shroud of the Saint – 145pts
Spirit Walkers – horde – Brew of Strength – 260pts
Spirit Walkers – horde – Blessing of the Gods – 255pts
Guardian Brutes – horde – Potion of the Caterpillar – 250pts
Stampede – horde – Brew of Haste – 275pts
Beast Pack – troop – 70pts
Beast Pack – troop – 70pts
Harpies – troop – Staying Stone – 95pts
Brutox – 220pts
Brutox – 220pts
Tribal Longhorns – regiment – 145pts
Tribal Longhorns – regiment – 145pts
Total 2300pts
Luke’s Varangur
Warband – horde – 180pts
Sons of Korgan – Regiment – 230pts
Sons of Korgan – Regiment – Blessing – 255pts
The Fallen – horde – healing brew – 245pts
The Fallen – horde – 240pts
Tundra Wolves – troop – 110pts
Mounted Sons of Korgan – Regiment – Potion of the Caterpillar – 280pts
Horse Raiders – troop – 115pts
Magus – Famulus, Mount, Bloodboil, inspiring talisman – 165pts
Ice Queen – Famulus, drain life, heal, shroud of the saint – 120pts
King on Chimera – 310pts
Funny Bone – 50pts
Total – 2300pts
Prematch rolls
Terrain
We rolled Map pack 5 from the TO’s chart which consisted of:
2*buildings, which had to be placed on the centre line, 9” apart and connected by a wall
2*additional buildings (all height 4 and impassable)
2*Hills (all height 2)
So this was one game where my pathfinder wouldn’t really come into the fore. As such I pretty much matched Luke’s placement so we had a symmetrical table (which meant we didn’t have to worry about what side to choose. Lazy gaming I know!
After placing the terrain in looked like this:

Scenario
The scenario played was ‘Pillage’: You must place D3+ 4 objective markers on the board at least 12” away from another (we rolled 7). Each player takes it in turn to place an objective. At the end of the game any scoring unit within 3” controls the token. Like the terrain, these were pretty much symmetrical in placement with one dead centre and 3 each side.
Nominated Unit
I honestly can’t remember what I chose as my nominated unit to gain experience if it survived (it may have been the Guardian Brutes again). I’m also not sure what unit Luke chose. Either way it didn’t matter as I do know that neither of our nominated units survived!
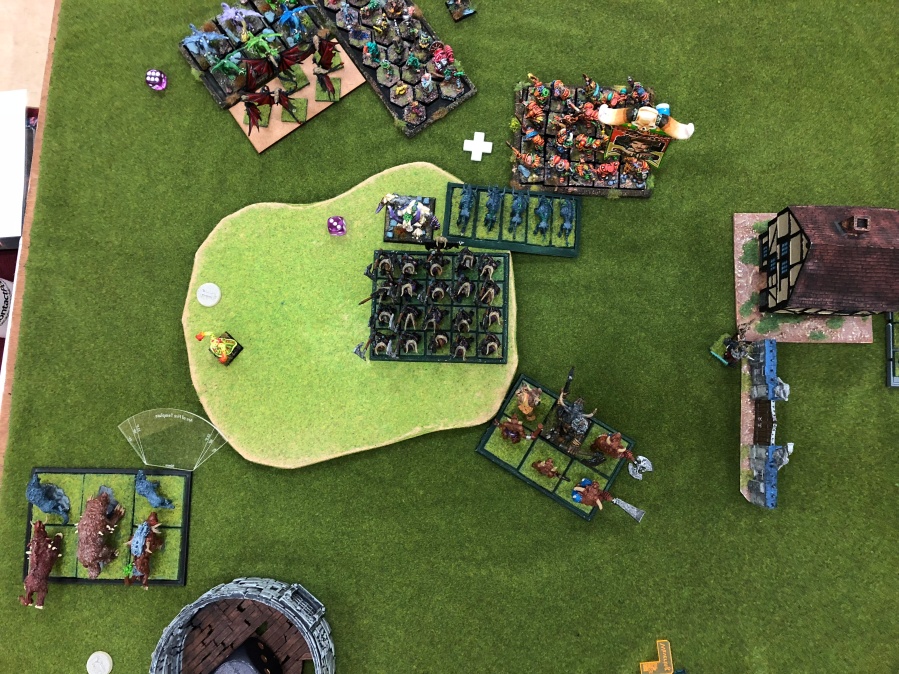
Deployment & Plan
With one token square in the middle of the board, I knew I had to send one of my spirit walker hordes straight at it, knowing that its flank would be protected by the buildings. It would be backed up by the shamans who could hide behind buildings whilst still giving support. I then split my forces pretty evenly on both sides. I’ll admit to being a little worried about the equal ability of Luke’s forces to dish out damage, combined with their higher armour. After deployment it looked like this.


Opening Gambits
The mighty herd won the first turn and after the compulsory careful measuring of the opponents charge distances, moved up to just outside of them. The one exception was the Brutox on the far flank who steamed up at the double to threaten the Tundra Wolves (with the house preventing any flank charge against it. Both Shaman also moved up at speed to shelter in the lee of the two central houses.


The Varangur also choose to move up with the Horse Raiders blocking the Guardian’s to allow one of the Sons of Khorgan units to advance at speed. The funny bone was also utilised as chaff on that flank to occupy the Stampede. The Tundra Wolves did a rapid about face and swiftly fled the Brutox.


First Strike
The Beast Pack moved to block the Sons of Khorgon unit, backed up by the longhorns, allowing the Guardians to swiftly remove the Horse Raiders. They were careful to back up once the mounted marauders were destroyed to prevent a retaliatory strike against them. Khazbar game out from behind the house to cast Critters call on the Varangur King on Chimera so he couldn’t fly behind the herd lines next turn. The Harpies flew up to block the Warband and the Fallen and the Stampede moved back a bit.
In the centre the Spirit Walker Horde moved up to the protection of the wall, laying claim to the objective there.
The other beast pack sped forward to block both the Sons and Fallen on my right flank, which allowed the second spirit walker horde to position itself for a counter. The Longhorns moved up beside them and the two Brutox’s turned to threaten flanking manoeuvres.


The Counter
The Varangur right flank moved immediately to force an advantage. The Fallen and Warband crushed the harpy unit to make sure the meddling flyers would not block their path again. The Sons of Khorgan consolidated the hold on the objective by sweeping aside the warbeasts. The mounted King, deprived of his flight, moved into combat with the longhorns and although they didn’t break, they were seriously wounded. The nearby funny bone moved to prevent the stampede from charging the King (the fallen were just out of range).
In the centre, the mounted sons lowered their lances and crashed into the spirit horde. The impeding wall and the size of the opponents unit ensured that the Sons were unable to break them on the charge. The inevitable grind was about to begin.
The left flank was looking dangerously vulnerable and so chances had to be taken. The regiment of Sons charged into the dogs to take them out and the Fallen swung in a 90 degree move that bought them out of the charge arc of one of the Brutox and close to two objectives. The Wolves, that had previously fled, moved up to threaten a flank charge. The longhorns took a few wounds from a lightning bolt.


The ‘should have been’ Hammer blows
The Longhorns counter-charged the King and although didn’t make much of an impact, they at least damaged him enough that he was again disordered (so couldn’t fly). The nearby Stampede, with its path blocked, decided discretion was the better part of valour and backed up a bit to try and hold the objective. The Guardian Brutes tore into the Sons of Khorgan, inflicting massive damage and with an almost guaranteed removal of the unit, the Sons managed to get insane courage and held. I couldn’t believe it. I rolled snake eyes, the only thing that wouldn’t remove them. That flank was looking decidedly shaky next turn.
In the centre, the stalemate continued with the spirit horde inflicting a fair chunk of damage on the mounted sons. It was helped by the shaman healing the horde of most of the wounds they had previously suffered.
My right flank was looking in a lot better shape. One Brutox charged into the front of the fallen. The second, bypassed them and hit the nearby Sons. This bit of sneaky manoeuvring allowed the Longhorns to charge the flank of the Fallen and between them and the Brutox, that unit was swiftly removed. The second horde of spirit walkers was quick to join the other Brutox and fully brutalised the regiment of Sons and with another ‘guaranteed’ removal of a unit. You guessed it, I rolled another snake eyes, so the unit stayed on the table. You just couldn’t make this up!


A Second Chance
With the unexpected double bonus thrown his way, Luke was quick to try and capitalise. On his right flank, the funny bone stayed in position, blocking the stampede. His Fallen moved up to be able to threaten them in the next turn. Due to the footprint, his warband was unable to join combat but it wasn’t needed as the Sons were able to dispatch the Brutes (and in the process removing their Elite upgrade gained last game). The King then removed the Longhorns. This left that flank pretty much dominated by his forces.
The central battle continued with his Mounted Sons continuing to attack the Spirit Warriors. Though they inflicted a large amount of damage, heals the unit had received previously, made it almost impossible for them to be removed.
Seeing a chance to even the odds on his left, the mortally wounded Sons, hit the Brutox but failed to kill it. The Magus again called down lightning bolts into the Longhorns and it proved too much for them and they fled. The Wolves then hit the other Brutox and also caused damage but the great beast was able to shrug it off.


Final Moves
With my left flank lost, I backed up my Stampede further, to sit on top of the objective (a mistake that I’ll cover later).
In the centre, boosted by the Shaman, the Warriors defeated the Mounted Sons and ran them down. This not only meant they took control of the central objective but they were now firmly ensconced between the two houses.
On my right, the Warriors and Brutox combined to hit the Regiment of Sons. This time the Varangur unit weren’t so lucky and were swiftly removed. The other Brutox hit the Wolves, causing serious damage (and regenerating in the process). Needing only to beat a 3 to remove them and thus capture the objective, I bloody rolled a 3 (much to the amusement of the crowd watching the game).

In his final moves of the game the Sons of Khorgon maintained their positon on the objective. The Warband next to them, moved up to capture the other objective. With nothing to lose, the Fallen hit the front of the Stampede. Though they took damage, they weren’t removed. However, due to the back peddling that the Stampede had done in the previous turn, it meant that the fallen were able to contest that object (meaning no one claimed it).
With his only other move, the Wolves counter charged the Brutox, looking for a lucky takeout. It was not to be and with that done, we ended the game.


Result
We each held 3 tokens at the end of the game so it was a draw.
We also had to record unit strength killed, in case of any tiebreakers:
Me = 8 points of unit strength killed (Horde 1*3=3, Regiments 2*2=4, Troops 1*1=1)
Luke = 8 points of unit strength killed (horde 1*3=3, Regiments 1*2=2, Troops 3*1=3)
Neither of our nominated units survived the battle to gain experience. On top of that, because the Guardian Brutes were destroyed, they also lost their Elite ability.
Luke’s Warband had previously gained experience and because they survived, they retained their bonus +2 attacks.
Conclusions
What a frustratingly close game! A draw was probably a fair result but man, rolling doubles 1’s on two separate occasions, when in both instances the units should have been removed, was frustrating to say the least! Then rolling the 3 for the wolves’ nerve test, on my final turn, was the icing on that bitter cake! What made it worse (or funnier for Luke) was on all three occasions, the same group of club members had wandered over just in time to witness the rolls.
On the final turn, we did have a discussion about whether his King could charge the flank of the Spirit Walkers in the centre. Technically, from the unit placement, it could have done but only because I’d been lazy with moving them on the overrun (and hadn’t moved them all the way). Luke was a gent’ about that but shows the importance of actually properly moving units.
Luke and I had our normal after game chat driving home and he was of the opinion that I probably should have won the game. There is an argument for that but although I was unlucky with the nerve rolls, I had been rolling hot with my attack rolls, so it probably evened out.
With regards to the objectives, I had made a few mistakes too. Moving the Stampede to allow him to contest that one was a blunder. Their footprint was enough that parking them in front of it (rather than on it), would have prevented him getting within 3” of it.
That said, on the far flank, although my Brutox failed to either contest that objective (as Luke’s placement was better) or kill his wolves (and thus overrunning to capture that objective), bouncing back after losing combat, was enough to get him in range of the uncontested objective behind him (my other Brutox was just out of range). This ultimately saved me from actually losing the game.
I think that just goes to show how tight the game was (something I am used to when facing him – the last game of the Wood Elves vs his Bretonnians was not a normal occurrence!).
I should also point out that due to taking no notes, the time delay between playing and writing and the lack of photos (compared to my normal fare), there is a large amount of poetic licence. There is a definite possibility that I’ve not only missed an entire turn (I think this is quite likely) but combats written about didn’t happen in the way I think (for instance the Longhorns on my right flank definitely charged the flank of the Fallen to help remove them but I can’t remember how they were then destroyed themselves. I guessed it was from a lightning bolt spell rather than combat but I’ve no idea!).
I’ll end with a final couple of comments around the game in general. Neither of us are fully sold on KOW. We both enjoy the game but much prefer Warhammer Fantasy. As such we both played this game with a bit of a nonchalant air and a lot of talking (hence why we didn’t actually complete 6 turns). That in itself made the game very enjoyable and a lot more relaxing. It’s not that we take Warhammer seriously, I think we just have more vested in it and so close games are more likely to get the heart racing.

Always enjoy your reports Mark! I like the ‘stepladder’ aerial shots too!
LikeLiked by 1 person
Took me a bit longer to pull these together as I didn’t have the same enthusiasm as with writing them for whfb (bit of a theme there 😀).
LikeLike